The Problem with Wax on Hardwood Floors
For decades, paste wax was the standard finish for hardwood floors. It gave a warm glow and provided basic protection. But over the years, layer after layer accumulates — and wax buildup creates a long list of serious problems that get worse the longer they go unaddressed.
Even if your floors haven't been wax-finished in years, you may still have residual wax from previous owners, from cleaning products that contain wax, or from the application of "floor restorer" products that deposit wax-like compounds with each use. This buildup is one of the most common reasons hardwood floors look dull despite regular cleaning.
Critical warning: If you attempt to apply polyurethane or have your floors sandlessly refinished over an existing wax layer, the finish will not bond — it will peel, flake, and fail within days. Wax must be completely removed before any refinishing work can be done. This is non-negotiable.
Signs Your Hardwood Floors Have Wax Buildup
Wax buildup often goes unrecognized because it develops gradually over time. These are the telltale signs that wax is the culprit behind your floor problems:
Yellowing or Amber Discoloration
Wax oxidizes and yellows over time, giving floors a dingy amber cast that no amount of cleaning removes.
Dull, Hazy Appearance
Multiple wax layers trap and seal in dirt, creating a flat, cloudy look even on floors that have just been "cleaned."
Smearing When Wet Mopped
Wax softens when wet and smears across the surface, leaving streaks and an uneven sheen that looks worse after cleaning.
Uneven Shine or Patchy Finish
High-traffic areas wear through the wax faster, creating visible patches where the floor looks different from less-traveled zones.
Sticky or Tacky Feel
Wax that has absorbed years of foot traffic residue becomes tacky underfoot, attracting dirt faster than a clean finish would.
New Finish Won't Bond
If previous refinishing or screening attempts failed or peeled quickly, wax contamination is the most likely cause.
Why Professional Wax Removal Matters
Wax removal sounds straightforward — but done incorrectly, it causes significant damage. Consumer-grade strippers are often too aggressive, penetrating the wood grain and lifting the stain underneath the wax, leaving blotchy, uneven discoloration that's expensive to correct. Chemical strippers that aren't fully neutralized leave a residue that prevents new coatings from adhering just as badly as the wax did.
Professional wax removal uses commercial-grade stripping solutions applied in controlled quantities, combined with agitation methods that lift wax without saturating the wood. Immediate extraction prevents the stripper from penetrating beyond the finish layer. Thorough neutralization and rinsing ensures the surface is completely clean and ready for whatever comes next.
The simple water test: Want to know if your floors have a wax finish? Apply a few drops of water to a low-traffic area. If the water beads up and sits on the surface, you likely have a polyurethane finish. If it soaks in slowly or leaves a white haze as it evaporates, wax is almost certainly present. We can also assess your floors during a free consultation.
Our Wax Removal Process
Every wax removal job is tailored to the floor's specific condition — the age of the wax, the number of layers, and the finish beneath. Here's how we approach it:
Step 1 — Floor Assessment
Before any product is applied, we identify the type of existing finish, the extent of wax buildup, and any areas of concern — spots where the finish has worn through, staining beneath the wax layer, or evidence of previous stripping attempts. You'll know exactly what to expect before we begin.
Step 2 — Commercial Wax Stripper Application
We apply a professional-grade, pH-balanced wax stripper in controlled amounts across the floor surface. The solution is worked into the wax with soft-bristle agitation pads on a low-speed buffer, loosening the wax from the finish beneath without penetrating the wood itself. Dwell time is monitored carefully — too short and the wax won't fully release; too long and the stripper risks affecting the stain layer.
Step 3 — Wax Extraction
Loosened wax and stripping solution are extracted immediately using wet vacuuming to prevent redepositing dissolved wax onto the surface or allowing excess moisture to absorb into the wood. This step is critical — extraction must be thorough enough that no wax residue remains in low spots or wood grain texture.
Step 4 — Edge and Detail Work
Wall edges, corners, and areas around floor vents and thresholds are stripped by hand with detail tools. These areas are where wax buildup is typically thickest and where machine buffing can't reach.
Step 5 — Neutralization and Final Rinse
A neutralizing rinse is applied across the entire floor to stop the stripping action and balance the surface pH. This step is essential to ensure that any subsequent cleaning, hardwood cleaning service, or refinishing work bonds correctly to a chemically neutral surface.
Step 6 — Surface Verification
We perform a final inspection of the stripped surface under raking light to identify any areas of remaining wax, residue, or uneven removal. We don't leave until the surface is completely clean and ready for the next step in your floor's restoration.
The Benefits of Starting Fresh
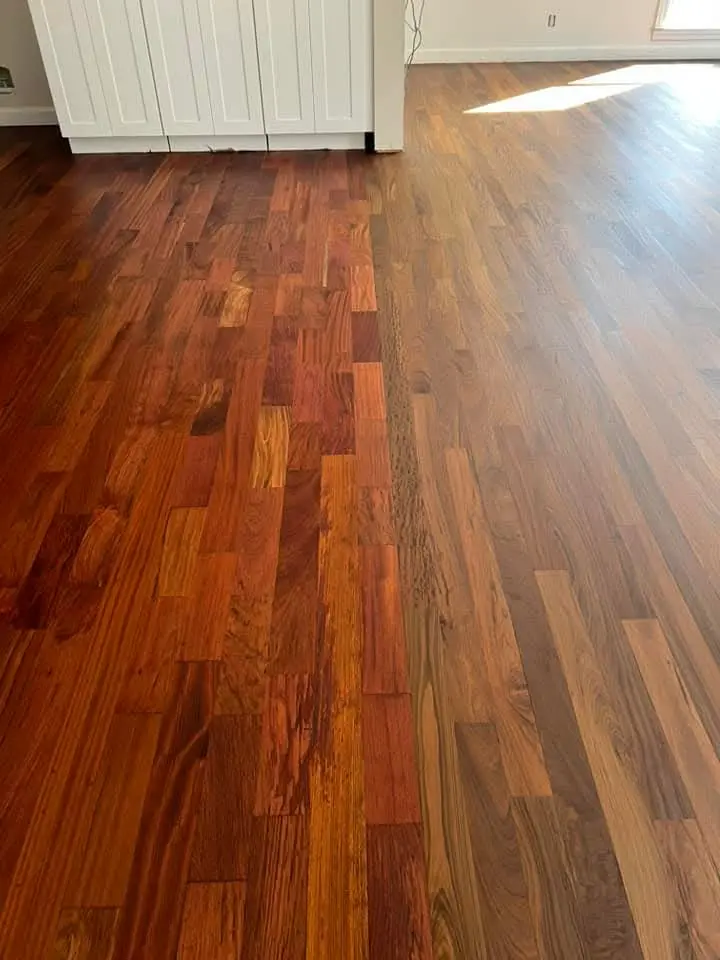
True Finish Revealed
With wax gone, the actual condition of your floor's finish becomes visible — often looking dramatically better than it did under years of wax buildup.
Refinishing Is Now Possible
After professional wax removal, your floors are ready for sandless refinishing or a new protective coat that will actually bond and last.
Easier to Keep Clean
A modern polyurethane finish is far easier to maintain than wax — no re-waxing required, and regular sweeping and damp mopping is all it takes.
Protects Your Investment
Clean, properly finished hardwood adds measurable value to your home. Wax-covered, dingy floors subtract from it.
What Comes After Wax Removal?
Wax removal is often the first step in a larger floor restoration. Once the surface is clean and neutralized, we can proceed with:
Frequently Asked Questions
How do I know if my floors have wax or polyurethane?
The water droplet test is the easiest home method: place a few drops of water on the floor. If it beads on the surface, you likely have polyurethane. If it soaks in slowly or leaves a white ring, wax is present. You can also rub a small area vigorously with a white cloth — wax will leave a residue on the cloth. We're happy to assess your floors during a free consultation as well.
Can I apply polyurethane over wax myself?
No — and this is one of the most costly mistakes homeowners make. Polyurethane will not bond to a waxed surface. The new coat will appear fine initially but will begin peeling and flaking within days to weeks. The wax must be completely removed and the surface neutralized before any new finish can be applied.
Will wax removal damage my floors?
Professional wax removal, done correctly, does not damage hardwood floors. The risk of damage comes from using the wrong products (harsh solvents), applying too much solution and allowing it to saturate the wood, or failing to neutralize the surface after stripping. Our process is specifically designed to avoid all of these issues.
How long does wax removal take?
Most residential wax removal jobs are completed in a single visit. The time depends on the square footage and the number of wax layers present. Heavily built-up floors with decades of wax may require additional passes. We'll give you a realistic time estimate during our assessment.
Can I walk on the floors the same day?
Yes. Once the neutralizing rinse has dried — typically within 1–2 hours — the floor is safe for light foot traffic. If we proceed directly to sandless refinishing the same day, the combined drying time applies to the new finish coat.
Do I need to move my furniture?
Yes — the floor surface needs to be completely clear for the stripping process to work properly. We'll provide a clear checklist of what to prepare when you schedule your appointment.
100% Satisfaction Guarantee. Every wax removal job is backed by our satisfaction guarantee. If the result isn't what we promised, we'll return and make it right at no additional charge. That's the KC Clean Carpets standard on every service we offer.